Nexus-sonatype-搭建docker 镜像私有仓库
Nexus-sonatype-搭建docker 镜像私有仓库
公司网络隔离策略变动导致之前搭建的docker hub不能直接访问。为了解决环境中存在的这一问题,决定在环境中搭建docker私有仓库。对比harbor和nexus3后决定采用nexus3。采用nexus3的主要原因是用于安装镜像仓库的服务器资源非常的low之后1个core和2g memory。
服务器配置:
| 系统版本 |
CentOS7.7 |
| CPU核心数 |
1core |
| 内存大小 |
2G |
| 服务器数量 |
1台 |
下载软件包:
Linux版本Nexus下载地址
官方文档:
https://help.sonatype.com/repomanager3/product-information/download
nexus安装:
由于服务器内存严重不足,所以需要调整nexus的启动参数,不然nexus就启动不起来。
nexus目录结构:
1
2
3
4
5
6
7
8
9
10
11
12
13
14
15
16
17
18
19
20
| $ tree -L 3 /data/app/nexus/
/data/app/nexus/
├── nexus-3.40.1-01
│ ├── bin
│ │ ├── contrib
│ │ ├── nexus
│ │ ├── nexus.rc
│ │ └── nexus.vmoptions # 启动参数配置文件
│ ├── deploy
│ ├── etc
│ ├── lib
│ ├── NOTICE.txt
│ ├── OSS-LICENSE.txt
│ ├── PRO-LICENSE.txt
│ ├── public
│ ├── replicator
│ └── system
├── sonatype-work # 数据存储目录
└── nexus3
|

调整了nexus的内存参数之后为了以防物理内存不够用,接下来还需要调整启用swap,不然这条小机器就宕机了。详细调整说明请移步:https://www.digitalocean.com/community/tutorials/how-to-add-swap-on-centos-7
我这边操作步骤:
1
2
3
4
5
6
| $ dd if=/dev/zero of=/swapfile count=4096 bs=1024k
$ mkswap /swapfile
$ swapon /swapfile
$ swapon -s
$ blkid /swapfile |awk -F'"' '{print "UUID="$2" "$4" "$4" sw 0 0 "}' >> /etc/fstab
$ cat "vm.swappiness = 10 \n#vm.vfs_cache_pressure = 50" >> /etc/sysctl.conf
|
nexus安装部分结束!!!
nexus配置
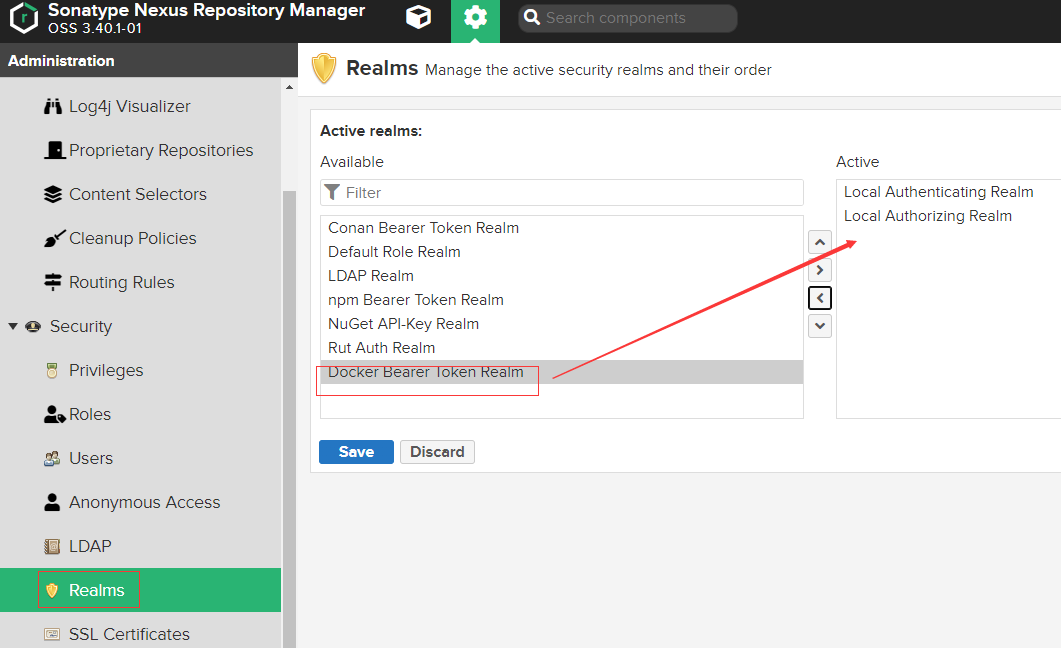
首先需要激活nexus的docker beaer token realm
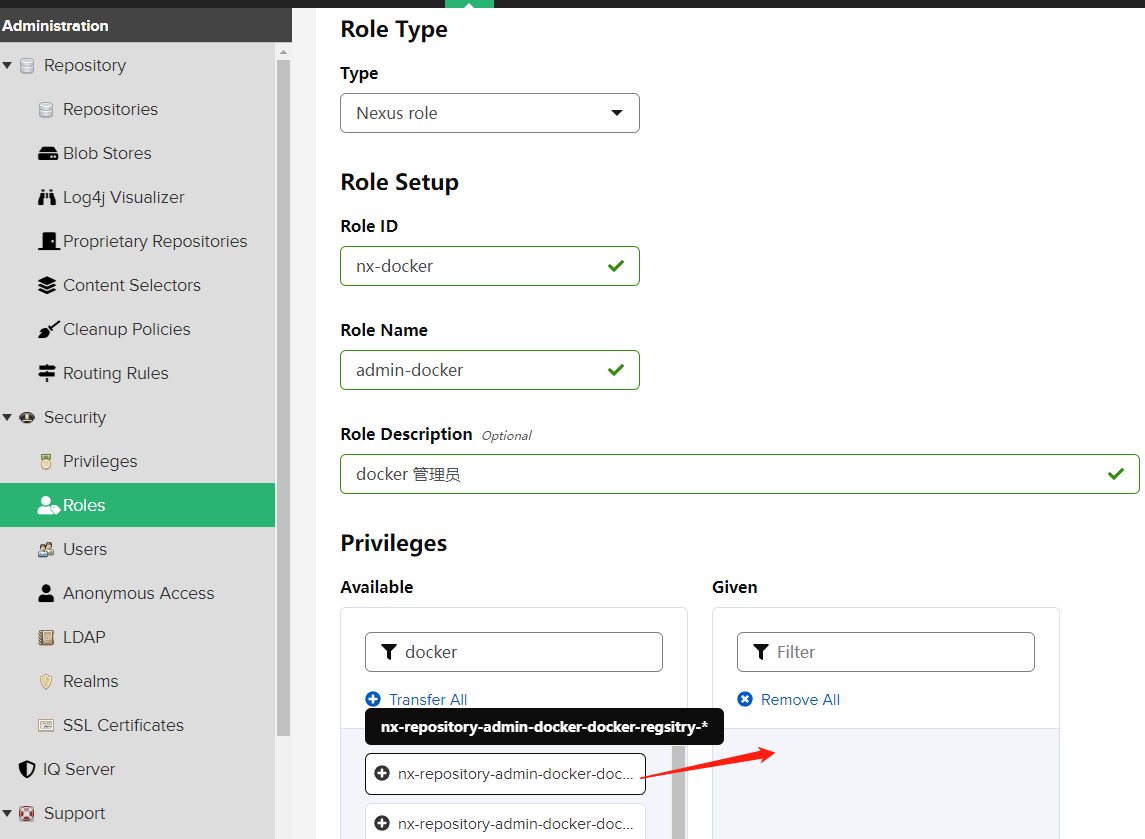
配置docker镜像仓库的用户角色
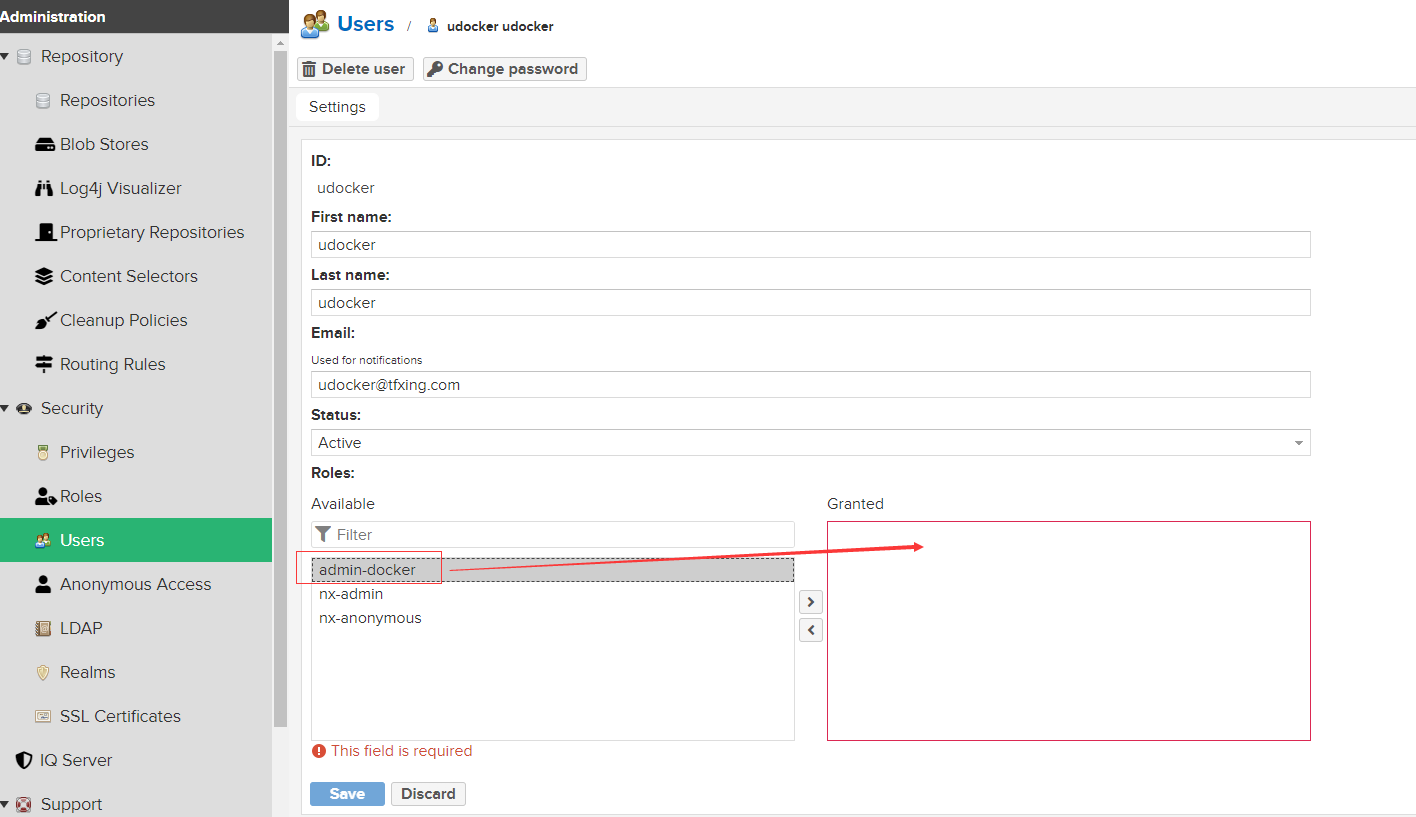
新建用户并分配角色
新建docker hosted仓库,左侧菜单:Repostory -$ Repostories -$ Create repostory
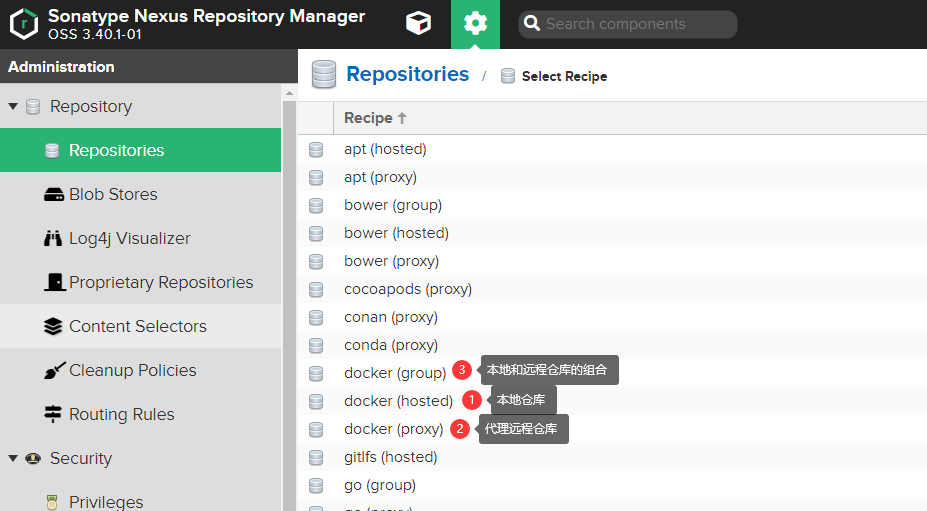
这里选择hosted,建立本地私有仓库
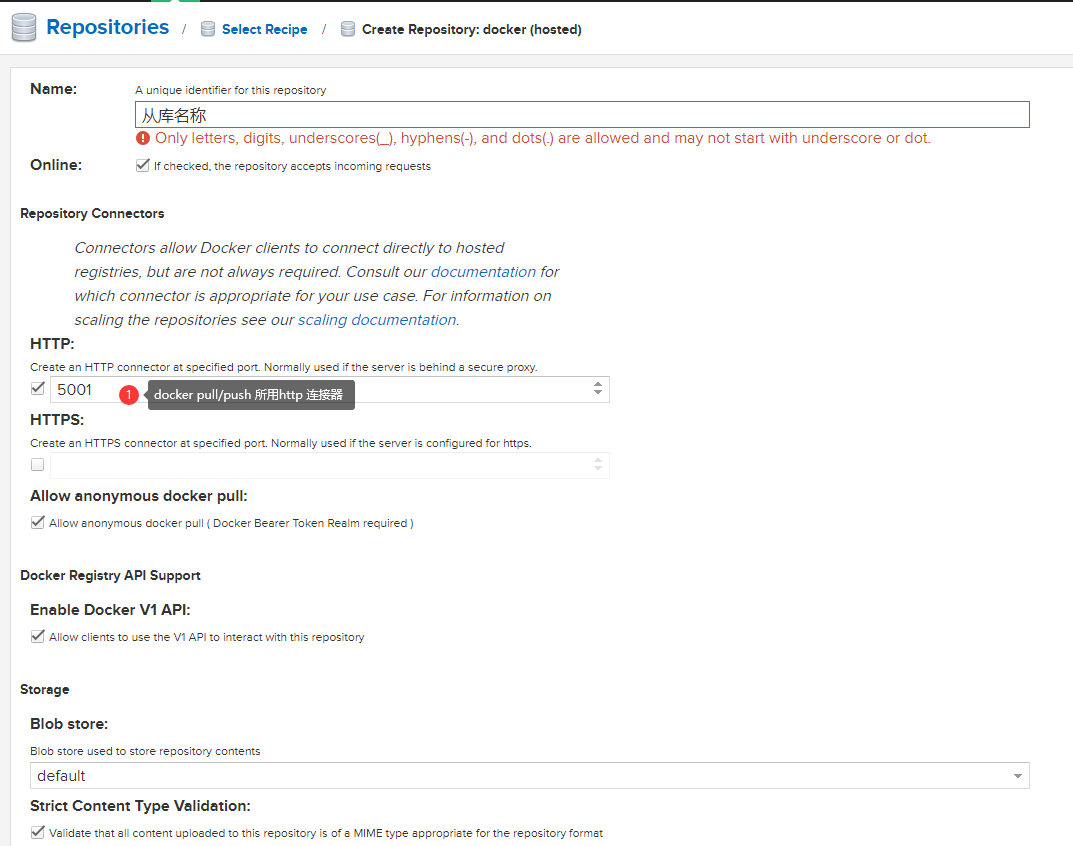
至此镜像仓库配置完毕
nginx代理nexus
由于docker是采用push和pull采用ssl方式因此需要配置nginx的ssl。因此需要生成自签名的证书,由于go在17.x之后对ssl证书进行了升级:需要在证书中包含SANs信息才能被通过。因此需要生成包含SANs信息的证书。生成脚本如下:
1
2
3
4
5
6
7
8
9
10
11
12
13
14
15
16
17
| $ openssl genrsa -out ca.key 2048
# 生成crt
$ openssl req -new -x509 -days 3650 -key ca.key \
-subj "/C=CN/ST=SC/L=CD/O=example, Inc./CN=example Docker Registry CA" \
-out ca.crt
# 生成证书请求文件
$ openssl req -newkey rsa:2048 -nodes \
-keyout registry.example.com.key \
-subj "/C=CN/ST=SC/L=CD/O=example, Inc./CN=*.example.com" \
-out registry.example.com.csr
#生成自签名证书
$ openssl x509 -req -extfile <(printf "subjectAltName=DNS:example.com,DNS:registry.example.com") \
-days 3650 -in registry.example.com.csr -CA ca.crt -CAkey ca.key -CAcreateserial \
-out registry.example.com.crt
|
nginx配置文件:
1
2
3
4
5
6
7
8
9
10
11
12
13
14
15
16
17
18
19
20
21
22
23
24
25
26
27
28
29
30
31
32
33
34
35
36
37
38
39
40
41
42
43
44
45
46
47
48
49
50
51
| $ cat /etc/nginx/conf/vhost/registry.example.com.conf
server {
listen 443 ssl;
server_name registry.example.com;
access_log logs/registry-access.log;
ssl_certificate /mnt/app/nginx/conf/key/registry.example.com.crt;
ssl_certificate_key /mnt/app/nginx/conf/key/registry.example.com.key;
ssl_protocols TLSv1.1 TLSv1.2;
ssl_ciphers 'EECDH+AESGCM:EDH+AESGCM:AES256+EECDH:AES256+EDH';
ssl_prefer_server_ciphers on;
ssl_session_cache shared:SSL:10m;
client_max_body_size 0;
location /v2 {
proxy_set_header Host $host;
proxy_set_header X-Forwarded-Proto $scheme;
proxy_set_header X-Forwarded-Port $server_port;
proxy_set_header X-Forwarded-For $proxy_add_x_forwarded_for;
proxy_set_header Upgrade $http_upgrade;
proxy_set_header X-Real-IP $remote_addr;
proxy_read_timeout 900s;
proxy_pass http://x.x.x.x:5001;
}
location /v1 {
proxy_set_header Host $host;
proxy_set_header X-Forwarded-Proto $scheme;
proxy_set_header X-Forwarded-Port $server_port;
proxy_set_header X-Forwarded-For $proxy_add_x_forwarded_for;
proxy_set_header Upgrade $http_upgrade;
proxy_set_header X-Real-IP $remote_addr;
proxy_read_timeout 900s;
proxy_pass http://x.x.x.x:5001;
}
location / {
proxy_set_header Host $host:$server_port;
proxy_set_header X-Real-IP $remote_addr;
proxy_set_header X-Forwarded-For $proxy_add_x_forwarded_for;
proxy_set_header X-Forwarded-Proto "https";
proxy_pass http://x.x.x.x:8081;
}
}
|
由于证书是自签名的,因此还需要在docker客户端上安装对应的ca证书。安装也很简单,只需要将上面生成的ca.crt文件拷贝到docker客户端所在系统的/etc/docker/certs.d/<对应registry域名或者ip$/ 目录下就行了。操作演示:
1
2
| $ mkdir -p /etc/docker/certs.d/registry.example.com/
$ cp certs/ca.crt /etc/docker/certs.d/registry.example.com/
|
验证
1
2
3
4
5
6
7
8
9
10
11
12
13
14
15
16
17
18
19
20
21
22
23
24
25
26
27
28
29
30
31
32
33
34
35
36
37
38
39
40
41
42
43
44
45
46
47
48
49
|
$ docker login registry.example.com
Username: udocker
Password:
Login Succeeded

$  docker logout registry.example.com
Removing login credentials for registry.example.com


$ docker rmi 4ce
Untagged: registry.example.com/library/example-devops:v1
Untagged: registry.example.com/library/example-devops@sha256:5d29550866a38af9fbd68583a465227424f99a6d74b01bc8dcab108723d0a78f
Deleted: sha256:4ceb67ae105888be4884855dcedf58b61e86142d5e30f0c06a16293cd7e736b5

$ docker pull registry.example.com/library/example-devops:v1
v1: Pulling from library/example-devops
530afca65e2e: Already exists
cc8c14b1a767: Already exists
1f40cdde4dbc: Already exists
b2dc0f78b277: Already exists
4ee964fed49e: Already exists
0a21e09e15e0: Already exists
2f830ef42252: Already exists
cadb37b0c40c: Already exists
4f4fb700ef54: Already exists
c74ef55cb264: Already exists
Digest: sha256:5d29550866a38af9fbd68583a465227424f99a6d74b01bc8dcab108723d0a78f
Status: Downloaded newer image for registry.example.com/library/example-devops:v1
registry.example.com/library/example-devops:v1

$ docker images
REPOSITORY                                    TAG       IMAGE ID       CREATED      SIZE
registry.mmyueche.com/library/example-devops   prod      7ff252f4b729   2 days ago   790MB
registry.example.com/library/example-devops     v1        4ceb67ae1058   6 days ago   388MB

$ docker push registry.example.com/library/example-devops:v1
The push refers to repository [registry.example.com/library/example-devops]
3b6a7021ab10: Layer already exists
5f70bf18a086: Layer already exists
31e145e3b4e1: Layer already exists
4e9c2055435c: Layer already exists
d03c32b5a731: Layer already exists
7ed14f14c0d3: Layer already exists
d6219b31634f: Layer already exists
8aee288c0534: Layer already exists
dc6b8d77e79b: Layer already exists
ec34fcc1d526: Layer already exists
v1: digest: sha256:5d29550866a38af9fbd68583a465227424f99a6d74b01bc8dcab108723d0a78f size: 2417
|
至此利用nexus搭建docker私有仓库的所有步骤完毕,总结一下:nexus上的用户角色配置以及docker-registry的ssl认证是关键。操作过程中一定要主力体会和理解!!!